
A Textured ceiling is my favorite…said no one ever.
Painting them is even worse. Not sure why anyone thought “putting a popcorn or orange peel texture on ceilings would look amazing!” Hindsight is 20/20.
We’ve taken the hassle out of how to paint a textured ceiling for you. Read on to get all the tips and tricks to get this job done easier and faster.

Can You Paint Over a Popcorn or Textured Ceiling?
Absolutely! If your popcorn ceiling is looking tired or you want to change the color, painting over it is totally doable. What About Stippled Ceilings?
Yep, those too. Just keep in mind they’ll take a bit more prep work and probably a special roller to get the paint on evenly. Instead of struggling with a brush or roller on that bumpy surface, I highly recommend using a sprayer — it makes the job way faster and smoother.
Work smarter, not harder.
How to Prepare a Textured Ceiling for Painting
Sanding textured ceilings isn’t really an option. First, make sure your house is recent enough that asbestos isn’t a concern in your ceiling texture. Once you’re sure, tape off your edges and get ready to cut in.
If you have a regular flat ceiling, lightly sanding with a sanding wand helps the primer stick better. Got mold or mildew? Clean the area with TSP, let it dry, then prime with a mildew-blocking primer like Kilz.
Do You Need to Cut In When Painting a Ceiling?
Yes, twice actually. When painting walls, you’ll need to cut in right up to the ceiling line. Then, when you paint the ceiling itself, cut in close to the walls.
I recommend painting the ceiling first — that way you avoid drips landing on fresh walls. It’s a little trick to keep things clean and neat.
Do You Need to Paint A New Textured Ceiling?
Not sure why anyone would be putting in textured ceilings in new builds but here we are. Can you tell I am not a fan of texture?!?! Anyways, moving on…
New textured ceilings should be both primed and painted to protect and seal the surface from humidity, mold and mildew. All the air in your home rises up and hits the ceiling, this includes grease etc.! The easiest way to paint a textured surface is 100% with a paint sprayer.
There is a tool called a ceiling edging tool. It’s different than the usual edging rollers available. While we haven’t used one, it looks pretty neat. Helps you to cut in with perfectly straight lines every time.
A total time saver. You load paint onto the tool and then roll it along the edge of your ceiling or wall. Decent price too!

How to Cut in a Popcorn Ceiling when Painting
Cutting in a ceiling is tricky enough, but when it’s popcorn textured, things get even trickier.
Painter’s tape won’t stick well to popcorn ceilings, so you’ll need to rely on an angled brush instead. Load your brush with plenty of paint, but apply it gently to avoid peeling off the texture.
Work in small areas and expect to do a second coat for full coverage. Keep in mind, textured ceilings soak up more paint than smooth ones, so factor that into your supplies.
Using a straightedge with a 3-inch angled brush can really help keep your lines clean. Alternatively, a ceiling edging tool works great for cutting in where walls meet ceilings.
Do You Paint Your Ceilings or Walls First
It’s best to tackle ceilings first. This way, any drips or splatters fall onto unpainted walls and are easier to fix.
Plus, ceilings are usually white or a light color, so if paint does get on your walls, it’s simpler to cover white paint on colored walls than the other way around.
Painting a Textured Ceiling with a Roller Tips
Thick or Long Nap Rollers are the key to getting an even and complete coat on your textured ceilings. They have thicker threads/material on them compared to regular rollers.
For textured ceilings, you should look at getting a ¾ inch nap. Check the different types you can purchase below.
Don’t use too much paint on your roller to avoid uneven edges, lines and splatter. Also, paint in the opposite direction that you painted on your primer.
Cut in and then paint in small sections so the paint blends together.

How to Paint a Ceiling Without Roller Marks (textured or not)
Roller marks are usually left behind because the paint was applied too thick. Also, if you paint too slowly and the paint has a chance to dry before you do your next stroke, then it won’t blend and leave marks.
This is why you should only cut in one small section at a time and then roll paint on: to ensure it blends perfectly. Of course, you could just use a paint sprayer and eliminate the rollers and brushes all together!
How to Paint a Textured Ceiling Like a Pro (with a Paint Sprayer)!
How to apply textured ceiling paint is best done with a paint sprayer. When spraying paint, prep work is key. You will want to mask off anything in the room that you don’t want to get overspray on. For example, light fixtures, electrical outlets, furnace vents, windows, doors etc.
Move all the furniture out of the room so you have a ton of space to walk and paint overhead. This avoids start and stop marks on the ceiling from when you’ve stopped/pulled on the sprayer trigger.
Use a drop cloth, plastic sheeting or newspapers to cover the flooring
Don’t forget to suit up or wear really old clothes that you don’t mind getting paint on. Also, get out your paint respirator mask and some safety googles and you’re ready to go!
Lightly sand all surfaces that you plan on painting with a pole sander. Don’t forget your sanding screens! You don’t need to go crazy here, just a quick once over should be enough to get the primer to stick well.
How to Paint a Ceiling with a Paint Sprayer
Spraying a textured ceiling is THE way to go. No other method will deliver professional results on those popcorn or orange peel surfaces. Below is some advice for getting great results on your ceilings.
You will absolutely need to strain your primer and paint before running it through your spray gun.
You might even need to thin it, depending on your sprayer. Check out our easy to follow instructions on thinning both latex and oil based paints.
Now fill the reservoir of your spray gun with the paint that you’ve strained into the bucket. Make sure the tip you’re using is compatible with the paint you’re using.
Different types of paint require different spray gun tips, so refer to your owner’s manual and manufacturer recommendations for best results.
Once you’ve got the paint loaded into the gun, test your spray pattern on a test board. Use a scrap piece of plywood or cardboard that is lying around somewhere.
In a pinch, you can even use the paint can.
Adjust the spray until you receive an even pattern that provides consistent coverage. You can turn the spray into horizontal or vertical patterns based on how you adjust the tip.
Join our Email List for more Tips and Info!
Let’s Crush that Textured Ceiling DIY!
Start by making smooth side-to-side strokes with your sprayer. For best results, move your whole arm instead of just your wrist—this also helps prevent wrist strain during longer sessions.
Focus on a section about 3 feet wide and 4 feet high. Begin by spraying horizontal passes, going back and forth evenly. Then switch to vertical passes over the same area to ensure full coverage.
Moving too slowly can cause the paint to dry on the surface mid-stroke, leading to uneven overlap marks you’ll have to fix later.
Always start your arm movement before squeezing the trigger. Starting the spray while stationary can create thick spots at the beginning of each stroke.
Likewise, release the trigger just before ending your stroke to avoid “understroking,” which leaves dot-like marks instead of a smooth finish.
Once you’re comfortable, experiment with slight overspraying. Begin pressing the trigger just before your stroke reaches the target area and release it just after you finish. This technique gives you consistent, even coverage across a wider zone.
For the best finish, plan on applying several thin coats rather than one heavy one. Thick coats with a sprayer rarely yield professional results.
Since your work area is masked and protected, take your time and do it right the first time. This saves you the hassle of fixing mistakes later and ensures a flawless textured ceiling.
Recommended Textured Ceiling Paint Sprayers
#1. Graco Ultra Cordless
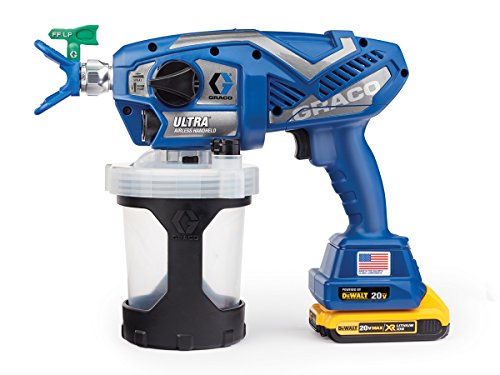
- Powered by DEWALT XR Lithium Ion System
- Fully Repairable for Extended Life
- Uses RAC X FFLP Spray Tips
- Triax Triple Piston Pump with ProConnect
If you need the convenience of a cordless sprayer, but want the effectiveness of an airless sprayer too, then this is the model for you. It’s flexibility and profitability make it perfect from spraying a textured ceiling.
The pressure controls are the nicest feature of this Graco Cordless Paint Gun. You can adjust your PSI levels to work at the speed you are most comfortable.
You can expect a flawless finish no matter how fast you work. Plus, most paints can be used straight from the can—no thinning needed—cutting down your prep time significantly.
This model comes equipped with a triple piston pump and RAC X FFLP spray tips, delivering powerful and consistent spray performance. It also includes two 20V DeWalt lithium-ion batteries for long-lasting cordless operation.
What’s awesome about Graco Spray Tips is that you can switch to any tip you need, including a fine finish low pressure tip! Get all the spray tip info you need, straight from Graco.
Compared to the older models that used to be manufactured, the Graco Ultra Cordless Airless Handheld Paint Sprayer provides an incredible experience. We found it to be well worth the investment.
If you’re interested in taking a look at a few more cordless sprayers, we take a look at a few of the best models available in our cordless sprayer reviews.
Perfect Lighting
Portable
Easy to set up
Doesnt take up much space
Time to set up and take down
#2. Graco Magnum X5

- 1 YEAR WARRANTY
- INCLUDES 515 TIP
- CONTROL PAINT FLOW
- SPRAY PAINT UNTHINNED
- SPRAY DIRECTLY FROM PAINT BUCKET
- FAST AND EASY CLEAN-UP
With this Graco airless spray gun, you receive a paint sprayer that is fully adjustable. You stay in control of the flow of the paint as you work to create specific results.
The stainless-steel piston pump packs enough power to spray unthinned paint at high pressure, ensuring a smooth, consistent finish.
Latex paints perform best with this sprayer. It handles thicker stains fairly well, but really needs those with a heavier consistency to work properly.
One of the best parts is that it pulls paint straight from the can, so you can jump right into your project without any extra prep.
It works with both 1 gallon and 5 gallon cans thanks to a paint supply hose that is flexible instead of rigid like other models with a similar design. Hook yourself up with a 20 inch extension rod and save your back.
When storing, put some Graco Pump Armor into your sprayer to protect the pump parts. You’ll thank me later.
Weighing 15 pounds, you can also take this unit just about anywhere and achieve professional results.
We also appreciated the easy-to-access adjustable pressure controls that are on this Graco paint spray gun
Everything you need is placed on a dial that is easy to turn, even while working, and the symbols for each setting are placed in such a way that you can easily see them so you don’t have to guess at what you’re doing.
Awesome Quality
Easy Clean PowerFlush Adapter
Overspray
#3. Wagner Control Spray Max
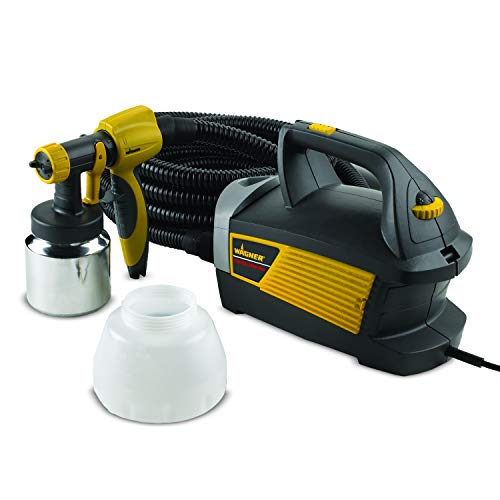
- Turbine system
- 1.5 quart cup
- 20 ft hose
- 2 nozzles included: one for detail smooth finish another for semi smooth finish
This model by Wagner is extremely reliable to get that textured ceiling done, without breaking your budget.
No matter what type of paint or stain you choose to spray, the Wagner Control Spray Max HVLP Sprayer gives you options.
This sprayer lets you create spray patterns ranging from a small ½-inch width up to a full foot, all while maintaining precise control.
Wagner recommends thinning latex paint by 10% to 20% for the best finish, but in our experience, some latex paints may require thinning up to 40%.
Because of this, it’s important to watch your spray technique closely to prevent clogging. Pushing beyond these limits tends to cause problems.
Using this sprayer for tasks like painting bedroom walls is not ideal. It’s also not suitable for outdoor jobs like fencing or siding.
If you’re planning to paint the exterior of a house, this model just won’t cut it.
No compressor needed
Flow and air pressure are adjustable
Oil based paint is a no no
Large Investment
Painting Ceilings Problems and How to Solve Them
The biggest problem when painting a ceiling, textured or not, is getting the edging line straight where the ceiling meets the wall.
To solve this, use edging tools like a ceiling edging tool or an edging roller.
Blending the cut in portions with the paint is another issue that can be solved by cutting in and then painting in small sections before the paint dries.
Uneven paint is another issue. Make sure that you don’t use too much paint on your brushes or rollers, and use even quick strokes with your sprayer.
Also, prime your ceiling before you paint it to create a smooth surface for the new paint to bond to.
To avoid seeing lines in your ceiling, remember to paint your primer in one direction and then the 1st coat of paint in the opposite direction. Lay down the 2nd coat of paint in the same direction as your primer and you won’t see any lines showing through.
Always paint your ceilings with a flat finish to hide imperfections. You don’t need to buy ceiling paint, just a regular old flat finish paint will do.
How to Paint a Ceiling without Making a Mess
Not making a mess all comes down to taking the time to do proper prep work. Remove all the furniture from the room and anything you don’t want to get any paint on.
Lay down plastic sheeting or newspapers to cover your flooring, counters, anything you want to keep clean.
Also, hanging some sheeting in front of the window would be ideal; then nothing will get on there.
If you’re going to be using a sprayer, you will definitely want to get yourself an extension wand to reach the ceiling easily without breaking your back, a sturdy ladder, and make sure that your hose will reach far enough for when you’re up the ladder a few feet or walking the length of the room.
How to Paint a Large Ceiling
Painting a large ceiling can actually get done pretty fast.
You would follow the same steps as painting a smaller ceiling, but you will have to work a bit faster to make sure you are blending the paint strokes together before they dry.
Only cut in small sections at a time as well to prevent the same thing from happening. Get a friend to come by to help and crush those big ceilings in no time.
Backrolling
What is Backrolling?
Backrolling is the process where, after spraying paint onto a surface, you follow up with a roller or brush to even out the coat and help the paint penetrate better.
The basic sequence is: spray first, then roll or brush, and finally let the paint dry.
Not every project needs backrolling, but it’s especially helpful when working with unfinished wood or surfaces that have been painted or stained before—even if the sprayer manufacturer doesn’t explicitly say it’s necessary.
How to Paint a Ceiling with a Brush
Painting a ceiling with just a brush is a slow and labor-intensive task—expect to spend several hours or more depending on the size of the room.
You’d start by cutting in the edges with an angled brush, working in small sections, then brushing the paint onto the ceiling surface.
The challenge is that paint can dry as you work, causing uneven spots and visible brush marks. To avoid this, investing in a roller and paint tray is a smart move—it will save you time and create a much smoother finish.
How to Paint a Ceiling Without Streaks
The best way to avoid marks is to overlap your roller and/or sprayer painting strokes by 50%. Another tip is to roll and spray with techniques to avoid applying the paint too thick or too thin.
Third, is painting with enough speed so that the previous stroke doesn’t have a chance to dry before you paint over it with your next stroke.
Painting over paint that is dry prevents it from blending together, leaving marks. This is also why you should only cut in on your walls etc. in small sections and then paint that section right away.
When rolling, try not to apply a bunch of pressure onto the ceiling via the roller. This will avoid ridges of paint forming at the edges of the roller.
Do Ceilings Need to be Primed?
Should you primer a ceiling before painting? Of course, you should prime all surfaces that you plan on painting.
Primer helps paint to bond to the surface, makes your paint last longer, and makes the colors richer. It also protects against moisture, humidity, mold and mildew.
What kind of Paint Do You use on a Textured Ceiling?
Some folks will try to sell you on buying paint labelled as ceiling paint. Don’t fall for it. You can use any old flat finish paint or even an eggshell to paint your textured ceiling.
Can You Just Prime a Ceiling and Not Paint?
Well yes, if for some reason you can’t finish off painting your ceiling, you could leave it primed (but not painted) for up to 30 days.
After that, the benefits that you get from the primer will no longer work and you will have to reprime before painting.
How Many Coats of Primer on a Ceiling? Does a Ceiling Need 2 Coats of Paint?
Standard coats of primer on any surface is 2. That way you make sure to have full even coverage and get all the benefits that come with using primer. Make sure you know how long it takes primer to dry before applying a coat of paint.
Same goes for paint. Painting new ceilings is ditto. 2 coats is the standard amount recommended by most manufacturers.
How Long Between Paint Coats on a Ceiling?
If you’re brushing/rolling on paint in ideal conditions (a low humidity, higher temp environment with ventilation), each coat of paint should only take an hour or two to dry.
If you’re spraying paint, this time will be reduced because you are putting on thinner coats than if you brushed or rolled the paint on.
Get full details about how long you should wait between coats of paint.
Best Way to Paint a Ceiling Without Splashing
Make sure not to put too much paint on your brushes and rollers. Not only will this lead to paint splattering and splashing everywhere, your paint job will be uneven and drying time will be affected.
Do You Paint a Ceiling Towards the Window?
Which direction should you paint a ceiling? We recommend starting from the part of the ceiling closest to the window and working you way across the room.
This way the light from the window shows up anything you’ve missed on the ceiling. Make sure that your spray pattern is perpendicular to the entrance of the room too.
Textured Ceiling Conclusion
Painting textured ceilings is no fun, but we hope with the tips and tricks above, that you are more confident than ever to tackle your DIY!
Join our Email List for Tips and Tricks!
- Can You Paint Over a Popcorn or Textured Ceiling?
- How to Prepare a Textured Ceiling for Painting
- Do You Need to Cut In When Painting a Ceiling?
- Do You Need to Paint A New Textured Ceiling?
- How to Cut in a Popcorn Ceiling when Painting
- Do You Paint Your Ceilings or Walls First
- Painting a Textured Ceiling with a Roller Tips
- How to Paint a Ceiling Without Roller Marks (textured or not)
- How to Paint a Textured Ceiling Like a Pro (with a Paint Sprayer)!
- How to Paint a Ceiling with a Paint Sprayer
- Join our Email List for more Tips and Info!
- Let’s Crush that Textured Ceiling DIY!
- Recommended Textured Ceiling Paint Sprayers
- #1. Graco Ultra Cordless
- #2. Graco Magnum X5
- #3. Wagner Control Spray Max
- Painting Ceilings Problems and How to Solve Them
- How to Paint a Ceiling without Making a Mess
- How to Paint a Large Ceiling
- Backrolling
- How to Paint a Ceiling with a Brush
- How to Paint a Ceiling Without Streaks
- Do Ceilings Need to be Primed?
- What kind of Paint Do You use on a Textured Ceiling?
- Can You Just Prime a Ceiling and Not Paint?
- How Many Coats of Primer on a Ceiling? Does a Ceiling Need 2 Coats of Paint?
- How Long Between Paint Coats on a Ceiling?
- Best Way to Paint a Ceiling Without Splashing
- Do You Paint a Ceiling Towards the Window?
- Textured Ceiling Conclusion
- FAQs
- Join our Email List for Tips and Tricks!
FAQs
Check out our indoor paint sprayer post with detailed discussion and reviews of the best indoor paint sprayers.


