
With the best paint sprayer for cabinets, you’ll be able to create a new look quickly, affordably, and with little effort.
Don’t renovate: Repaint! Are you looking for an affordable way to remodel your kitchen?
Many spray guns for cabinets allow you to spray more than just paint. You can apply stains, lacquers, or even enamel.
Get perfect end result every single time.

Best Paint Sprayer for Cabinets
Pick from one of the best paint sprayers for cabinets below and get started today!
Best Paint Sprayer for Kitchen Cabinets: Editor’s Reviews
The best sprayer for cabinets focus on precision. They allow you to create specific results with consistency, so a professional look can be achieved.
Whether it’s the best HVLP sprayer for kitchen cabinets or you’re spraying cabinets with an airless sprayer, you’ll find a spray gun for cabinets here.
Best HVLP Spray Gun for Cabinets
Editor’s Pick of the Best Paint Sprayer for Cabinets
HomeRight Super Finish Max

- Easy to Clean
- HVLP Siphon Feed Spray Gun
- Adjustable Settings and Spray Patterns
- Comes with 3 tips
- Perfect for beginners and Pros
Take your cabinets to the next level with this HVLP paint sprayer from HomeRight.
Make sure that you give the Super Finish Max a closer look. Its our choice for the best paint sprayer for cabinets.
It offers the same functionality as the top models in the industry, but for a fraction of the price. It even requires less thinning that high-level models. If you want to start staining right away, this model will accommodate you. The lower levels of pressure with this HVLP model mean that you have less overspray to worry about.
Right out of the box, the HomeRight Super Finish Max has multiple spray settings that help you conquer more projects. You can also buy more spray tips making it even more versatile.
The Super Max comes with a 450 watt turbine motor. When paired with an interchangeable tip, most paint mediums can be sprayed. Three brass spray tips are included: 1.5, 2.0, and 4mm.
You can tackle your entire staining to-do list with this strong and lightweight sprayer.
Always pay attention to the connectors that you use on your HomeRight HVLP Sprayer. Some models offer users a connector that is smaller in diameter than the air hose that connects to the unit.
Because this is a restriction to the flow of the paint or other substance, pressure can build up at the connection and cause issues.
There are some elements of an HVLP design with this HomeRight model, but there are also some siphon feed elements included as well.
This feature helps maintain consistent spray pressure while you paint, stain, or varnish, enabling you to achieve a professional-quality finish.
We also appreciate the ergonomic enhancements incorporated into the design.
This model includes an air-blowing nozzle as well. When used without paint or finish, it produces a focused stream of air perfect for cleaning electronics, reaching under tables and chairs, or clearing dust from tight spots.
Weighing just 3 pounds, this sprayer won’t tire your hand during use, allowing you to complete projects faster than with many other models. While some craft sprayers are lighter, they often come with lower performance and don’t deliver the same quality results on furniture and larger woodworking tasks.
It’s super easy to find parts for this very popular paint sprayer. New paint containers and tips can be found online. Need a spray shelter? HomeRight makes that too!
Combine that with the brass nozzle for added durability and you can have confidence in the results you’re producing.
The 40 ounce cup is bigger than most other models (which have 32 ounce paint cups), and you should be able to cover about 90-100 square feet of paint area with one cup.
Good for a ton of projects
Lightweight
Adjustable Controls
Less overspray
Includes 3 spray tips
Not for commercial Use
Not great for large projects
Best Airless Paint Sprayer for Cabinets
Graco X5

- Spray unthinned paint directly from 1 or 5 gallon buckets
- RAC IV Switch tip lets you reverse the tip to clear out clogs
- Annual use up to 125 gallons/year
- Easy cleanup with PowerFlush Adapter
The Graco Magnum X5 Airless Sprayer is designed to be a light duty machine with an annual use recommendation of 125 gallons.
This sprayer is ideal for cabinet painting and easily earns our top recommendation as the best paint sprayer for cabinets.
With a spraying capacity of up to 27 gallons per hour, it outperforms many comparable models by over 10%. If you’re tackling a large cabinet makeover, this is definitely the best airless sprayer for the job.
You have complete control over the paint flow pressure at all times, allowing you to work at any pace while achieving consistent, professional results.
The reversible spray tip lets you clear clogs quickly, minimizing downtime and keeping your project moving.
The Magnum X5 includes a 25-foot hose and supports extensions up to 75 feet, giving you ample reach and flexibility for cabinet spraying. Simply mask off your work area and spray until the job is done.
Instead of relying on a paint cup or bag, this model uses a flexible suction tube that fits directly into paint buckets up to 5 gallons.
Graco also offers accessories that transform this airless sprayer into a versatile tool for multiple applications.
Our favorite is their 20 inch extension rod which saves your back when painting your fence, deck and ceilings.
Take the guesswork out of cleaning; the automatic priming helps to make sure that everything is cleaned out before you start on your next project
Equipped with a Power Flush Adapter, cleanup is super simple as well. You connect your Magnum X5 to a garden hose and flush it out quickly.
There is no disassembly required for the cleaning process. Once you’re done with your sprayer, use Graco Pump Armor to protect the internal parts and the pump.
Awesome Quality
Easy Clean PowerFlush Adapter
Overspray
Best Cordless Sprayer for Cabinets
Graco Ultra Cordless Airless
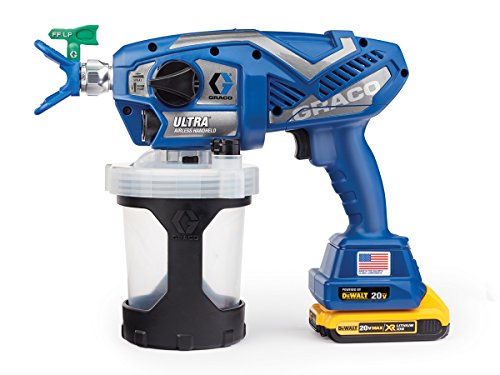
- MAX PSI 2000
- 514 tip included
- Comes w/2 batteries
- Powered by DEWALT XR Lithium Ion System
- Triax Triple Piston Pump with ProConnect
- Adjustable Pattern Fan Control
- 1 Quart cup
- Fully Repairable for Extended Life
- Uses RAC X FFLP Spray Tips
The effectiveness of an airless cabinet sprayer with the convenience of a cordless sprayer. Ditch your air compressor for your cabinet painting jobs.
Easy to adjust pressure controls on the Graco Ultra Cordless allow you to change PSI levels in a second, to work at a level you are most comfortable.
Cut down on prep time with this unit’s high PSI operation, which means most paints won’t require thinning.
Equipped with RAC X FFLP spray tips and a triple piston pump, it delivers a powerful and consistent finish. Plus, you save money since this cabinet sprayer includes two 20V DeWalt lithium batteries.
What’s awesome about Graco Spray Tips is that you can switch to any tip you need, including a fine finish low pressure tip! Get all the spray tip info you need, straight from Graco Products.
Cordless cabinet sprayers tend to be on the more expensive side, but the results speak for themselves.
We found it to be well worth the investment.
If you’re interested in taking a look at a few more cordless sprayers, we take a look at a few of the best models available in our cordless sprayer reviews.
Gets into Awkward Spaces
Sprays Unthinned Paint
Overspray
Large Investment
Wagner Control Max HVLP
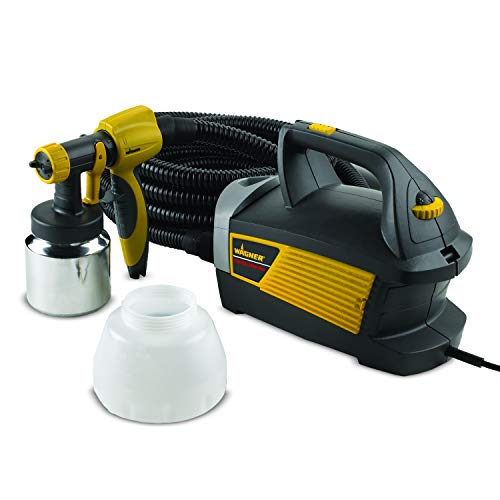
- 2 stage Turbine system
- 1.5 quart cup
- Sprays stains and latex
- Fan width 1/2″ to 12 inch
- 20 ft hose
- 2 nozzles included: one for detail smooth finish another for semi smooth finish
The Control Max HVLP sprayer is extremely reliable to get the job done, without breaking your budget.
No matter what type of paint or stain you choose to spray, the Wagner Control Spray Max HVLP Sprayer gives you options.
You can spray patterns ranging from a precise ½-inch up to a full 1-foot width with excellent control.
This sprayer requires thinning latex paint before use. Wagner suggests thinning latex by 10% to 20%, but in some cases, thinning up to 40% may be necessary to prevent clogging—so keep a close eye on this during your projects.
Thinner materials tend to cause more overspray, so exercise caution, especially when spraying stains.
This model is best suited for smaller tasks—it’s ideal for cabinets but not practical for larger areas like bedroom walls or fences.
Thanks to its high volume, low pressure design, you can achieve fine finishes with ease. Plus, the included 20-foot flexible air hose gives you added reach for comfortable spraying.
The Wagner Control Spray stands out as one of the top choices for cabinet spraying. While it performs well, we recommend screening your paint beforehand to ensure consistent results.
One downside is priming; if you don’t take the time to properly prime the sprayer, your finish may suffer.
No compressor needed
Flow and air pressure are adjustable
Oil based paint is a no no
Campbell Hausfeld
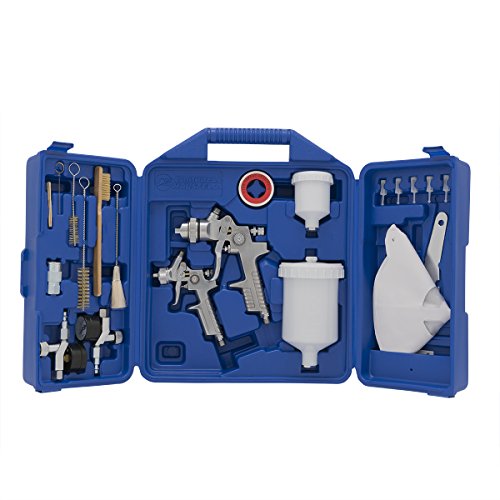
- Operate at 40 PSI
- Best for small or large jobs
- 0.7 and 2.1 CFM guns
- Adjustable paint flow
- Includes cleaning kit
- 10 paint filters included
This gravity feed paint spray kit gives you everything you need to get started on your next craft painting project.
Two spray guns in this Campbell Hausfeld Kit give you versatility. You can paint a variety of projects, including furniture, woodworking, cars, etc.
The two spray guns require 2.1 CFM and 0.7 CFM at 40 PSI. The air requirements mean you can use a smaller and probably cheaper air compressor with these guns.
When working on projects that require maintaining a wet edge, make sure your air compressor is powerful enough. You don’t want to have to pause mid-job waiting for your compressor to catch up. Some 5- to 6-gallon compressors may struggle to keep up with these spray guns, so keep that in mind.
This kit offers two paint container sizes, allowing you to tackle both small and larger projects. The gun’s design produces a softer spray that minimizes overspray while delivering smooth, detailed finishes.
With dual adjustable valves, you have excellent control over paint consistency at all times. The main gun features a 550ml gravity feed cup, while the touch-up gun includes a smaller 120ml cup.
You also get 15 paint filters in total—five of which are in-line filters—and three cleaning brushes to keep your tools in top shape.
Thanks to the gravity feed system, controlling paint flow is straightforward.
On the downside, we found the fan adjustments to be less consistent than expected. Some users have noted issues with the pressure gauge not always working or being difficult to adjust. The trigger requires a bit of effort to pull, which could cause hand or wrist fatigue during longer sessions.
The kit includes thread tape and even a wrench to ensure all your connections are secure.
What more could you ask for?
Control over paint consistency
Cleaning brushes and filters included
Make sure your compressor is big enough
Neu Master HVLP
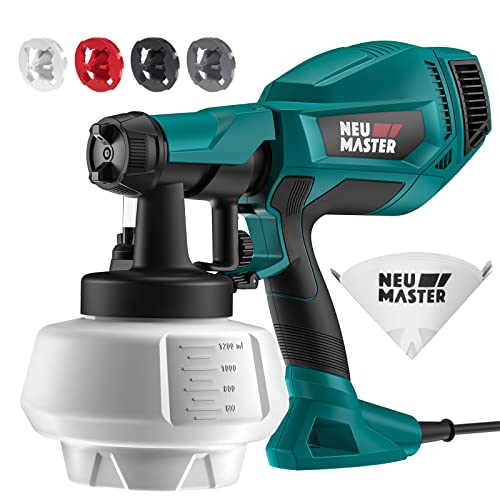
- 4 spray nozzle sizes included: 1.5, 2, 2.5 and 3mm
- Will Spray thinned latex
- 3 adjustable spray patterns
- 40 ounce cup
- 500 watt motor
This brilliant little sprayer offers a 40 ounce detachable container, a durable plastic housing, and enough pressure to spray even properly thinned latex.
Neu Master advertises that you can cover up to 54 square feet on a full paint cup, though our experience showed coverage can be slightly less depending on your spraying technique.
Despite its budget-friendly price, this sprayer includes several features usually found in higher-end models, which is impressive for an entry-level tool. It handles a wide range of finishes—from stains and latex to polyurethane—making it quite versatile.
Weighing just 3.5 pounds, it’s well-balanced and roughly half the weight of comparable sprayers, helping to minimize wrist fatigue during use.
One drawback is the relatively short power cord at 6.65 feet, so be sure to have an extension cord handy before you start your project.
Some users have noted that the unit tends to leak when held at angles other than horizontal unless all parts are tightened very securely. If you need to spray upside down or at awkward angles, this model may not be the best choice.
As with most budget sprayers, we strongly recommend straining your paint before use to avoid clogging and ensure the best results.
The Neu Master Kit includes:
- 1 * HVLP Paint Sprayer with 1200ML container
- 4 * Size Nozzles (1.5/2.0/2.5/3.0 mm)
- 1 * Viscosity Cup
- 1 * Cleaning Brush
- 1 * Cleaning Needle
- 1 * User Manual
You have the ability to switch between vertical, horizontal, and circular spray patterns, allowing you to tailor the spray to suit your specific project needs. Additionally, a material control knob makes it simple to fine-tune the settings for your selected spray pattern.
This sprayer comes with four different nozzles, enabling you to handle a variety of coatings, including sealers, stains, primers, and oil-based enamels.
If you’re working within a tight budget, this model stands out as one of the best affordable paint sprayers available. When you need a reliable sprayer to complete your project, this one deserves serious consideration.
Beginner Friendly
Adjustable Spray Patterns
4 diff spray nozzles included
2 year warranty
No viscosity instructions
A little tough to clean
Best Paint Sprayer for Cabinets: Buyer’s Guide
Can You Spray Paint Cabinets?
You absolutely can and should spray paint your cabinets with a paint sprayer. You will get faster results with a better finish than rolling or brushing. That’s how the Pros do it.
Paint Sprayer vs Rollers for Cabinets
When painting cabinets, the tool you choose can make or break your final result. A paint sprayer, when used with the right technique, delivers a thin, even layer of paint with minimal risk of runs or thick patches.
However, without proper technique, it’s easy to end up with dots, splotches, or uneven coverage.
One thing to keep in mind is that paint sprayers typically use more paint than rollers. Depending on the type of sprayer—whether it’s HVLP, airless, or gravity feed—you can expect to use 20% to 40% more paint.
Inexperienced painters or worn-out sprayer tips can increase that number even further, potentially wasting up to 50% more paint due to overspray.
Paint rollers apply a thicker layer of paint by default. While you can even it out as you roll, this thicker coat comes with a higher risk of drips or runs.
Plus, it’s difficult to get a consistent finish—roller marks are common, especially on vertical cabinet surfaces.
Overall, we recommend using a paint sprayer for painting cabinets. It provides a more professional, smooth, and even finish, especially on the flat panels and intricate edges of cabinet doors.
Spray Paint Vs Brush Painting Cabinets: Should You Brush or Spray Paint Cabinets?
Should you spray or brush paint your cabinets? The answer comes down to quality, speed, and finish. A paint sprayer atomizes the paint, breaking it into fine droplets that land evenly on the surface. This allows for a smoother finish with fewer coats.
Using a paint sprayer can be 3 to 4 times faster than using a brush or roller. You can paint all the cabinet faces, edges, and intricate corners in one pass instead of going over the same area multiple times.
And because the coats are thinner, they dry faster—making it possible to finish your kitchen cabinet makeover in a single afternoon.
Corners, edges, and recessed panels are a challenge for rollers and brushes. These tools can leave behind brush marks or uneven coverage, which then need to be touched up.
Paint sprayers easily reach these tight spots, reducing the time you spend on inspection and correction.
If you’re looking for professional-looking cabinets without paying for a professional, a paint sprayer is the way to go.
The finish will be smoother, more even, and more durable. Most importantly, your results will look high-end—even if you’re doing it yourself.
Features to Look for in a Cabinet Sprayer: Best Paint Sprayer for Cabinets
Easy to Adjust Pressure and Fan Controls
Stainless Steel Parts
Low Overspray
Easy to Clean
Delivers smooth, soft finish
Beginner Friendly
Project Size
Tips
Compressor Requirements
Cup Capacity
Portability/Weight of Sprayer
Adjustable Fan Widths and Spray Flow
Having control over your fan width and spray flow is crucial when painting cabinets. Whether you’re spraying primer, latex, or a clear coat, different materials need different flow rates and spray patterns.
Look for a paint sprayer that allows you to customize both the fan width and the paint output. This lets you dial in the perfect spray for your specific project, ensuring even coverage and a smoother finish.
Easy to Adjust Pressure and Fan Controls
Painting cabinets often requires on-the-fly adjustments. As the spray pattern changes slightly due to angle or distance, being able to easily tweak the fan width and air pressure can save your finish.
Choose a sprayer with intuitive, easy-to-reach adjustment knobs. This is especially important for beginners who may need to make frequent changes. Easy controls help you stay focused on your technique instead of fighting with the equipment.
Stainless Steel Parts
Paint sprayers with stainless steel or brass components are more durable, easier to maintain, and deliver consistent results over time.
These higher-quality parts resist corrosion and wear better than plastic alternatives, making them ideal for long-term use. Sprayers with quality internal components may cost a little more up front, but they’ll often give you better performance on projects like cabinet painting and last much longer with fewer repairs.
Low Overspray
Less overspray means less paint waste. Less paint waste means buying less paint saving you even more money when DIY spraying your cabinets. Don’t forget to cover the area that you want to protect from paint with a drop cloth to keep it from getting any overspray from your paint sprayer.
Easy to Clean
Keeping your cabinet sprayer clean is essential for long-term performance and smooth results. Many top-rated models come with their own cleaning kits, or you can purchase a specialized cleaning kit separately. Some sprayers can even be attached to a garden hose for a fast flush-out after use.
This feature saves you time and hassle at the end of your project and ensures your sprayer is ready for the next job.
Delivers a Smooth Finish
Cabinets demand a soft, smooth finish that looks professional. HVLP paint sprayers are ideal for this type of application. Their low-pressure design allows paint to settle evenly on the surface, reducing the chance of drips or orange peel texture.
If you’re after consistent coverage and a flawless result, HVLP is the way to go — especially for beginners.
Beginner Friendly
When learning how to spray paint cabinets, choosing the right sprayer can make all the difference. Avoid spray guns that require complex setup or constant maintenance. Look for options with simple adjustments, easy-to-clean parts, and widely available how-to videos.
Features like adjustable spray patterns and clear instructions will help you succeed without frustration. If you’re just getting started, it’s best to avoid overly technical equipment that could slow you down.
Project Size
The size of your cabinet project impacts your choice of sprayer. Larger projects require more paint and more time. Choose a sprayer that can handle the volume without constant refilling. Being realistic about your project scope will help you avoid interruptions and improve your overall results.
Tip Size you’ll Need
Make sure that your sprayer comes with the proper tip size you’ll need to spray your cabinets. The tip size will depend on the paint you’re using and what area of the cabinet you’re painting. Typically your looking at a 310 tip or 410 for doors and 210 for frames.
Compressor Requirements
Does your sprayer require a compressor? If yes, do you have one and is your compressor powerful enough to power your sprayer? Will the hoses reach around your project or do you need longer hoses?
Will you have to stop and wait for your compressor to catch up to your sprayer? I recommend getting a sprayer that pairs well with your compressor, so that you don’t have to stop and start painting repeatedly.
Cup Capacity
A large paint cup means fewer refills and better painting flow. Stopping frequently to refill a small paint cup can disrupt your technique and lead to uneven results. Look for a model with a high-capacity cup so you can keep moving without unnecessary breaks.
Portability/Weight of your Sprayer
Maneuverability is essential when painting cabinets, especially in tight spaces or when spraying overhead. Check that your spray gun is lightweight and easy to handle.
Hoses should be flexible enough to move around corners without tugging. If your sprayer is too heavy, you might find your arm getting tired mid-project, which can lead to uneven coverage or slower progress.
A lightweight, portable sprayer will help you stay consistent from start to finish.
HVLP Vs Airless for Spray Painting Kitchen Cabinets
For beginners, painting cabinets with an HVLP sprayer may be the best option. Modern HVLP spray guns don’t require as much experience as an airless.
HVLP spray guns paint slower than airless because they use lower pressure to apply the paint. This creates less paint mess and waste.
They also apply paint with a softer, smoother finish due to the low pressure. HVLP will paint thinner materials easily such as stains and varnish with professional results.
If you are working on smaller projects, or using water based materials, this would be your choice cabinet sprayer.
If you’re spraying thicker materials like latex, oil based paint, or primer and have some technical painting experience, an airless paint sprayer would work for you.
You will go through more paint if you are spraying cabinets with an airless sprayer because the high pressure of nearly 2000 PSI causes more paint pollution.
This means you will need to purchase more paint than if you used an HVLP cabinet sprayer.
Are Airless Paint Sprayers Good for Painting Your Cabinets?
Airless paint sprayers are powerful tools designed to cover large surfaces quickly. They operate at high pressure, which allows them to apply paint faster than HVLP sprayers.
This can significantly reduce your overall work time—especially useful for big projects. However, speed comes with a trade-off.
For beginners, an airless paint sprayer for cabinets might not be the best choice. The high-pressure application can make it harder to achieve a smooth, even finish on smaller or more detailed surfaces like cabinet doors and frames. Unless you have experience using one, the results may not meet your expectations.
Airless sprayers are typically favored by professionals due to their speed and ability to handle thick materials without thinning.
But with that speed comes more overspray, meaning more wasted paint and a messier workspace. If you’re spraying indoors or in a small area, this overspray can become a major issue, especially on detailed cabinetry.
In contrast, HVLP sprayers are more beginner-friendly and offer a finer, more controlled spray pattern. This makes them ideal for furniture and cabinetry where a smooth finish is key. HVLP sprayers also tend to produce less overspray, saving you money on paint and reducing cleanup time.
Cost is another consideration. Airless sprayers are usually more expensive than HVLP models, both in initial price and ongoing paint use. If you’re tackling a DIY cabinet painting project and want precise results without the learning curve or mess, an HVLP sprayer may be the better investment.
What to Budget for the Best Paint Sprayer for Cabinets
The best paint sprayer for cabinets is actually affordable. You can find the sprayer you need for $120 or less.
There are a few guns that are priced in the $50-60 range. Advanced models for interior painting will pull double-duty as a furniture sprayer or indoor paint sprayer as well.
Top spray guns for cabinets can be priced above $700. The versatility of the equipment makes it a good investment to give those old kitchen cabinets a makeover.
Should you Buy a Cheap Cabinet Sprayer?
I recommend that if you’re on a tight budget and need to buy a cheaper cabinet sprayer, that you read all of the reviews and check out images of the cabinets people have painted.
Make sure that you can get the results you want from the cheaper sprayer. Practice your paint stroke for awhile to get it right. Dial in your settings and make sure your cheaper sprayer can spray the type of paint you’re going to use.
How to Get a Smooth Finish when Painting Cabinets
Getting a finished product that looks professional and smooth depends on a few things.
You have to use the right spray tip for the job, sand and fix blemishes on your cabinets, prime with a good brand name primer, sand between coats, use a tough type of paint, and have the patience to wait for your primer and paint to fully dry.
The right sprayer for your experience level, either an HVLP or an airless sprayer along with the right painting technique, will make your cabinets shine.
Always use quality primer and paint with the right spray tip for your cabinets to get the smooth results you are looking for.
Best Spray Tip for Cabinets
A few recommended tips for your cabinets: 210, 311, and 315. Some might agree with me, while others disagree.
There are many different opinions on which spray tip is the best for painting cabinets. We can all agree though, that a fine finish tip with a smaller orifice that makes a soft spray is the best to achieve a silky smooth finish. This is because the paint is atomized so much more.
Additionally, don’t turn your pressure up very high. This makes your paint come out with more velocity, and won’t lead to a soft finish.
Painting Cabinets with an HVLP Sprayer
What type of paint sprayer is best for cabinets? We recommend an HVLP paint sprayer. HVLP sprayers are well suited for cabinet work. They apply paint with low pressure, resulting in a soft finish.
HVLP paint sprayers spray a slower, finer paint mist and are known for precision at impact on smaller jobs like cabinets and furniture projects.
Spraying Cabinets with an Airless Sprayer
Airless sprayers spray paint at high volume. They are great for large jobs because they apply paint in a thicker coat, faster than an HVLP.
If you’re looking for quick results instead of detailed results, you’d use an airless sprayer. Con is that you would need to purchase different tips to do each project, including your cabinets.
Check out our Airless Vs HVLP comparison post for a ton of details about picking between these two types of sprayers for your projects.
What is the Best Airless Paint Sprayer for Cabinets?
If you’ve decided to go airless, we recommend the Graco Magnum X5 for conquering your cabinets.
We like it because of a few reasons. #1. full control over pressure/paint flow. #2. 25 foot hose #3. Paint thick materials without thinning. #4. Sucks paint straight from can #5. Easy clean with an adapter that hooks up to your garden hose.
Join our Email List for more Tips and Info!
Painting Kitchen Cabinet Cost
Repainting your cabinets will cost you SOOO much less than renovating your kitchen. Spray painting your kitchen cabinets should cost around $100-500. All you need is a paint sprayer and a few gallons of paint to crush your cabinet DIY this weekend.
Painting over Painted Cabinets
There is nothing wrong with painting over painted kitchen cabinets! You don’t need to strip the paint off and get to bare wood to start repainting your cabinets. Same goes for cabinets that are stained or varnished.
You need to get all the grease off those cabinets first and then scuff up the surface well with sandpaper. This ensures the primer will bond and stick to the old surface. Once you’re done cleaning and sanding, it’s business as usual: get spraying!
Can You Paint Cheap Kitchen Cabinets?
Absolutely — you can paint cheap kitchen cabinets, and the results can be surprisingly impressive with the right prep and materials.
If a full cabinet replacement isn’t in your budget or you’re living in a rental where major renovations are off the table, painting is a cost-effective way to give your kitchen a serious facelift.
The key to a long-lasting finish? Proper prep and high-quality materials.
Even super affordable cabinets like laminate or melamine can be painted successfully. I once painted old melamine kitchen cabinets in a rental, and three years later, the finish still looks brand new.
Here’s exactly what I did:
- Degreased the surface. Cheap kitchen cabinets often hold onto cooking oils and grime. Cleaning thoroughly is the first must-do step.
- Sanded the melamine to help the primer stick better.
- Sprayed two coats of a high-adhesion, stain-blocking primer — one that fights grease and stands up to humidity.
- Let the primer cure for a few days.
- Sprayed two coats of enamel paint for a smooth, durable finish.
- Finished it off with a protective coat of polyurethane. (Honestly, I didn’t know what I was doing at the time — but it sealed the deal.)
It turned out great — and that kitchen makeover cost me a fraction of what new cabinets would have.
If you’re looking for a budget-friendly DIY kitchen cabinet upgrade, painting is one of the best options out there.
And while you’re at it, consider adding affordable trim or molding to flat cabinet doors to mimic the classic Shaker cabinet look. It’s an easy upgrade that gives basic cabinets a custom feel.
Best Way to Paint Kitchen Cabinets: How to Refinish Cabinets with Paint
Replacing your old kitchen cabinets can be expensive. Even a basic kitchen requires several thousand dollars of cabinets.
And if you’re planning a full renovation, that doesn’t include the removal of the old cabinetry or the installation of the new stuff.
The best paint sprayer for cabinets can make your kitchen, bathroom, or garage look brand-new without the same level of investment. Refurbish your cabinets instead of renovating!
All it takes is a few gallons of paint, a free weekend, and some practice with a good paint sprayer to get the job done.
Before you start painting, you’ll need to give your cabinets some prep work. Grease is common in kitchens and it will settle into the wood. Our recommended degreaser for kitchen cabinets is GP66.
Steps to Better Cabinets
- Remove cabinet doors
- Clean and degrease your cabinets
- Sand the surface
- Fill any imperfections with wood filler and sand smooth
- Mask off any contact surfaces, your counters, sinks, etc.
- Spray 2 coats of primer, sand between coats
- Apply 2 coats of paint
- Wait 24 hours for paint to dry and up to 30 days for paint to cure fully
Sanding Cabinets Before Painting
Once they’ve been cleaned, it is important that you sand your cabinets first even if they are not wood. A light sand will ensure the primer sticks on the surface.
How do you finish kitchen cabinets without sanding? You Don’t! Ignore the tutorials online that say otherwise. So, what grit of sandpaper is best for kitchen cabinets?
All surfaces must be sanded with a maximum 150-grit sandpaper if there is existing stain or paint. If you have varnish on your cabinets, you’ll need to use an 80-grit sandpaper.
Once you have sanded, inspect them for flaws. There may be scratches, dings, gouges, and other imperfections that have been picked up over time.
Use a wood filler (for wood cabinets) to create a smooth surface. This will get rid of wood grain too. Don’t try to sand out deep scratches, it will only create uneven surfaces on your cabinets. Then use a wet, clean, and lint-free cloth to remove any residue. Do not use a paper towel.
If you’re happy with your prep work, you’re ready to apply a primer. Use a primer that blocks stains for the best results.
Once you’ve got a primed, smooth surface, then your cabinets are ready to be painted with your new equipment.
Priming Cabinets
Priming cabinets is a MUST. To get those pro results, you have to prime your surface. This creates a better bond between the paint and the primer, and you end up with richer, more durable colors and a smoother finish.
Best practice when painting cabinets is to start at the top and work your way down. Most people actually start at the bottom and work their way up.
Starting at the top, it‘s easier to work out paint runs that may form when using the sprayer. Keep a small brush or roller available so you can smooth out the surface if a run forms.
Best Primer for Kitchen Cabinets
When spraying cabinets, you are definitely going to need to prime them first. The primer you use is very important.
This ensures that no stains bleed through, protects against humidity, steam, and the heavy use that your cabinets go through every day. So, what kind of spray paint should you use on kitchen cabinets?
Best Bonding Primer for Cabinets
PRO-CRYL from Sherwin Williams
More of an industrial/commercial type paint. Perfect cause that’s what the pros use. It will get you those awesome results you’re looking for.
Kilz Premium High Hide Water Based Formula
Great for high humidity areas like your kitchen or bathroom, covers about 300-400 sq feet/gallon. Works on all sorts of surfaces including drywall, plaster and wood.
Seals knots, sap and tanning from raw wood. You can paint over old varnish, paint etc.
How Many Coats of Primer on Cabinets?
We recommend 2 coats of primer on your cabinets. Since you’re spraying, it will go on thinner than brushing or rolling and will dry faster. Two coats ensures that you’ve covered the cabinets completely (and evenly) with primer.
How Many Coats of Paint for Your Cabinets?
In most cases, two coats of paint is enough to give your kitchen cabinets a smooth, durable finish. However, if you’re covering a dark color with a light paint, you may need three or even four coats for full coverage.
Don’t rush the process. Dry time matters. You should always wait at least 1–2 hours between coats, but that can vary depending on the paint you’re using, temperature, and humidity. Make sure your first coat is completely dry before spraying the next one. Painting too soon can lead to bubbling, peeling, and uneven finish — all things you want to avoid when painting cabinets.
Also remember: you can only paint one side of your cabinet doors at a time. You’ll need to factor in drying time and flipping the doors, so expect your DIY cabinet painting or refacing project to take around 4–5 days from start to finish.
If you’re looking for professional results with a DIY budget, taking your time between coats and allowing proper cure time is essential.
What is the Best Paint for Kitchen Cabinets?
You have many choices in paint for spraying kitchen cabinets. But, what kind of paint should be used on cabinets?
Oil-based paint is a cheaper option that requires a little extra maintenance, but is still quite durable and reasonably easy to clean.
Enamel is the better spray paint to use on kitchen cabinets because it dries with a harder surface. That makes it easier to clean and scratch-resistant. Since your cabinets will see heavy use, it’s important to ensure the finish is hard and lasts.
Best Kitchen Cabinet Paint
A latex enamel paint is the best option for painting your cabinets. You can save a little money by using a flexible latex as an undercoat and then the enamel latex as the top coat. What you need is something that cures hard because your cabinets will see heavy use.
Best Brand of Paint for Kitchen Cabinets
Paint quality matters on your cabinets. Here are our top 3 choices for the best cabinet paint you can use.
- Benjamin Moore Advance
- Valspar Cabinet Paint
- Sherwin Williams Pro Classic Water Base Alkyd
Best Paint for Bathroom Cabinets
Bathrooms and garages tend to have mildew and mold. This stuff needs to be gone before you paint.
Bathrooms see so much humidity and are at risk for developing mold and mildew if they aren’t vented properly.
To prevent the humidity from ruining your bathroom cabinets, paint those vanities with special primer and paint that’s durable and can take the humidity and heat that your family will dish out.
Our two top choices are to prime with Rust-Oleum or Kilz Kitchen and Bath Primer.
How to Remove Old Paint From Kitchen Cabinets
Maybe you want to reveal the wood underneath? Go for that bare wood look on your cabinets? If you’re set on removing the old paint instead of just painting over it, check out our post on how to remove paint from wood without chemicals.
How to Take off Cabinet Doors
When removing your cabinet doors, put the hardware for each cabinet in a baggie and label it so you know which cabinet it came from.
If you’re having trouble removing old hardware because it’s been painted over, get a hair dryer and blast heat on the hardware for a minute or two and presto! The paint comes right off the hardware.
How to Mask Cabinets for Spray Painting
You will need to tape off everything from countertops, floor, some of the ceiling, sinks, appliances, and anything else that you want to protect from overspray.
You don’t need to buy plastic sheeting either; you can use newspaper if that’s all you have.
Tape the inside of the cabinet box if you don’t plan on painting them as well. You’ll need a separate area to paint the cabinet doors like maybe your garage. You’ll have to tape that area up as well.
Check out this handy door spraying rack that let’s you stack your cabinet doors for drying instead of leaving them all over the place.
Conclusion
The best paint sprayer for cabinets will help you level up your DIY and create a masterpiece in your kitchen or bathroom. These sprayers will get the job done.
Many will even pull double-duty with multiple hobbies. That’s why there is so much to love in this category.
Cabinet Paint Sprayer FAQs
Enamel is the better spray paint to use on kitchen cabinets because it dries with a harder surface.
Benjamin Moore Advance, Valspar Cabinet Paint, Sherwin Williams Pro Classic Water Base Alkyd
Our two top choices are to prime with Rust-Oleum or Kilz Kitchen and Bath Primer.
- Best Paint Sprayer for Cabinets
- Best Paint Sprayer for Kitchen Cabinets: Editor’s Reviews
- Best HVLP Spray Gun for Cabinets
- Editor's Pick of the Best Paint Sprayer for Cabinets
- HomeRight Super Finish Max
- Best Airless Paint Sprayer for Cabinets
- Graco X5
- Best Cordless Sprayer for Cabinets
- Graco Ultra Cordless Airless
- Wagner Control Max HVLP
- Campbell Hausfeld
- Neu Master HVLP
- Best Paint Sprayer for Cabinets: Buyer's Guide
- Can You Spray Paint Cabinets?
- Paint Sprayer vs Rollers for Cabinets
- Spray Paint Vs Brush Painting Cabinets: Should You Brush or Spray Paint Cabinets?
- Features to Look for in a Cabinet Sprayer: Best Paint Sprayer for Cabinets
- HVLP Vs Airless for Spray Painting Kitchen Cabinets
- Are Airless Paint Sprayers Good for Painting Your Cabinets?
- What to Budget for the Best Paint Sprayer for Cabinets
- Should you Buy a Cheap Cabinet Sprayer?
- How to Get a Smooth Finish when Painting Cabinets
- Best Spray Tip for Cabinets
- Painting Cabinets with an HVLP Sprayer
- Spraying Cabinets with an Airless Sprayer
- What is the Best Airless Paint Sprayer for Cabinets?
- Join our Email List for more Tips and Info!
- Painting Kitchen Cabinet Cost
- Painting over Painted Cabinets
- Can You Paint Cheap Kitchen Cabinets?
- Best Way to Paint Kitchen Cabinets: How to Refinish Cabinets with Paint
- Steps to Better Cabinets
- Sanding Cabinets Before Painting
- Priming Cabinets
- Best Primer for Kitchen Cabinets
- Best Bonding Primer for Cabinets
- How Many Coats of Primer on Cabinets?
- How Many Coats of Paint for Your Cabinets?
- What is the Best Paint for Kitchen Cabinets?
- Best Kitchen Cabinet Paint
- Best Paint for Bathroom Cabinets
- How to Remove Old Paint From Kitchen Cabinets
- How to Take off Cabinet Doors
- How to Mask Cabinets for Spray Painting
- Conclusion
- Cabinet Paint Sprayer FAQs


