
You can use brushes and rollers to paint your interior walls. Or, you can learn how to paint a room with a paint sprayer.
When you get it right, the look of paint applied with a paint sprayer is flawless. Not only do you receive uniform coverage and color consistency, you also get the job done quicker than using other painting methods.

Paint Sprayers for Painting Rooms
Using a paint spray gun isn’t a grab-and-go process. If you’ve never used one before, then it is important to practice your application technique.
You can make your interior walls look terrible just as easily as you can make them look fantastic. If you have a single wall to paint, you might still consider one of the best indoor paint sprayers as there’ll always be a use for it in the future.
For whole-home support, a paint spray gun is a definite must-have. Here’s the Top Spray Guns for Painting Walls you can buy to get your paint DIY done fast with professional results.
Top Spray Gun for Painting Walls
Top 5 Paint Sprayers Editor’s Choice Reviews
Fuji Semi Pro 2

- Adjustable Pattern Fan Control
- 1 Quart cup
- 2 stage Turbine Paint System
- 25ft Hose includes air control valve to reduce overspray and bounce back
- 1.3mm tip included
- Fuji M Model Gun Included
- Convertible to Gravity Feed System with Parts
Instead of giving you a fast ticket to a mess, the Fuji Semi Pro 2 Spray Paint Machine gives users a painting system that they can use almost immediately thanks to its comprehensive design.
Although it comes with a premium price, we found that you’re going to receive premium results. If you want to paint a room fast, this is the sprayer for you.
The tradeoff for a little noise is worth it. The Fuji Semi Pro 2 is a bit on the noisy side, so hearing protection is a must if you’re using this sprayer indoors.
One downside to this spray system is the slight mist it produces during use, which can affect the surrounding air a bit. However, this is a minor issue considering how precise the results are.
You can dial in the atomization just right in seconds, which helps cut down on overspray significantly. That kind of control makes a big difference in the final finish.
Normally, we’re a bit hesitant to recommend siphon feed sprayers for most projects. But the Fuji Semi Pro 2 stands out by delivering excellent control and consistent results that you can trust.
Cleanup is straightforward and hassle-free—especially if you’ve done a good job masking your work area beforehand.
This model comes with air cap #13 and air cap #6 works the best for latex paint.
No compressor needed
Pattern controls
2 year warranty
Metal Housing
2 stage motor
Quick Connect Hose
Adjustable Fan Controls
Some overpsray
Weighs 25lbs
Graco Magnum Project Painter Plus

- Fully adjustable pressure
- Spray unthinned paint directly from paint can or bucket
- Easy clean up with PowerFlush adapter
- Annual Use up to 50 gallons/year
The Graco Magnum Project Painter Plus works with both 1 gallon and 5 gallon cans thanks to a paint supply hose that is flexible instead of rigid like other models with a similar design.
At just 15 pounds, this sprayer is lightweight and portable enough to take with you wherever your project leads, yet it still delivers professional-quality results.
One feature we really liked is the easy-to-reach adjustable pressure control. It’s all built into a simple dial that’s smooth to turn, even while you’re painting.
The icons on the dial are thoughtfully placed and easy to read, so there’s no guessing involved when you’re adjusting your settings on the fly.
Little overspray
Best with Water based only
Stains should be thicker to work well with this unit
Krause and Becker

- Fully adjustable pressure up to 3000 PSI
- 25 foot hose
- Flow Rate 18.6 gallons/hour
- No. 517 Nozzle 12- 16″ Fan Width
- Trigger Lock, Built in Filter
- Stainless Steel Paint Pick Up
What do you do if you don’t want to mess with the hassle of an air compressor? And what do you do if you don’t want to invest a small fortune into an airless sprayer?
The compromise you make might just be on this Krause and Becker 5/8 HP 3000 PSI airless paint sprayer.
With a built-in filter right in the gun and easy-to-use pressure controls, you’ll find that this lightweight spraying option is one of the best paint spray guns around. You will get your job done pretty effectively.
Built in trigger lock
Works with tons of Tips
Works with latex and oil paint
Easy Clean up
Can be tough to find spare parts
90 day warranty
Gallons/hr rating is confusing
Must thin down paint with finishing tips
Earlex HV5500
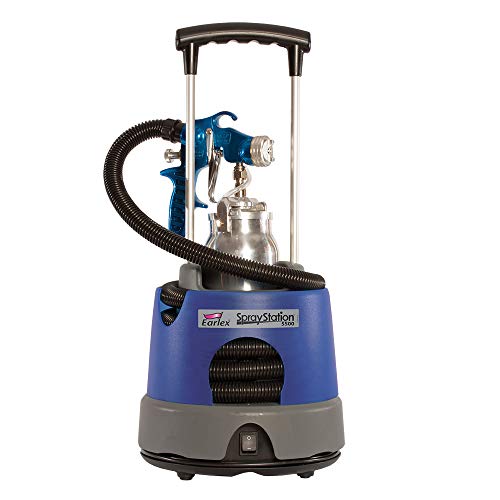
- Turbine system
- Adjustable Spray patterns
- 13 foot hose
What stood out to us about the Earlex Spray Station is its push-and-click design for adjusting the spray pattern.
No more struggling with tricky knobs or dials—you just push, and it clicks right into the spray pattern you need for your project.
This simple yet effective feature gives even busy contractors the control they need to finish jobs on schedule without hassle.
This pro spray gun is able to generate up to 42 CFM thanks to its 650w turbine, giving you consistent coverage on your shutters, trim or similar medium-sized projects.
Get yourself the specialized Earlex Spray Gun Cleaning Kit to get your unit super clean after use.
Consistent results
Sprays latex, lacquers, varnish, oil, stains, sealants
13 foot hose
Built in carrying handle
2 year warranty
Motor is a bit loud
Hose easy to dislodge
Neu Master
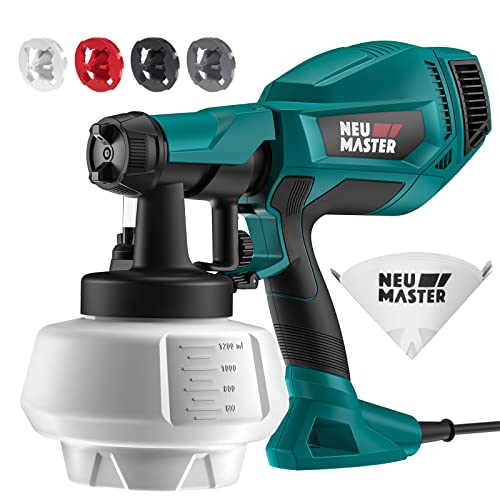
- 4 spray nozzle sizes included
- Will Spray thinned latex
- 3 adjustable spray patterns
This brilliant little sprayer offers a 1200ml detachable container, a durable plastic housing, and enough pressure to spray even properly thinned latex.
You’ll find some features on this budget-friendly sprayer that usually only show up on pricier models, which is a nice surprise for an entry-level indoor sprayer.
It lets you switch between vertical, horizontal, and circular spray patterns, so you can dial in the perfect spray for your project. Plus, there’s a material control knob that makes adjusting the settings quick and easy.
If you’re working with a tight budget but still want a reliable paint sprayer to get the job done, this one is definitely worth a closer look.
Beginner Friendly
Adjustable Spray Patterns
4 diff spray nozzles included
No viscosity instructions
A little tough to clean
Join our Email List for more Tips and Info!
What do I Need to Paint a Room?
Make sure that you gather all of your equipment before starting to paint. Here is the complete list of items that you’re going to need to paint a room properly with a paint sprayer.
- Spray rig
- Paint
- Thinners
- Paint strainer
- 5-gallon bucket
- Painter’s tape
- Plastic and Canvas drop cloths or tarps
- Personal protective equipment (goggles, respirator or mask, gloves, clothing protection)
- Test board
You can always wear some old clothes and be fine while painting.
When using a paint sprayer, however, a pair of painting coveralls with a hood is a good investment. You’ll protect your hair and clothes without worrying about what happens.
DuPoint makes a Tyvek coverall suit that is extremely affordable and includes shoe protection as well that is available.
How to Prep a Room for Painting
Paint spray guns atomize the paint, so it can be applied to the wall. This means that spray guns add air to the paint so it can be sprayed.
That is how you get the nice fan-like spray that comes from the nozzle. When paint is atomized, it will begin to float along the air currents in your home.
Every home has air currents. Maybe you have a window open. Your heating or cooling system could be turned off. Atomized paint will find its way to those currents and leave droplets in places you wouldn’t expect.
That’s why you must take time to set up your room before painting to avoid a big mess. Bring your painting supplies into the room. Then close the door if one is available. If not, hang a piece of plastic that covers the entire door jamb, so the paint droplets cannot go outside of the room.
Wall Preparation Before Painting
If you want your room to look professionally painted, it all starts with how you prepare the space. Using a spray gun can give you fantastic results, but prep work is key.
Start by lightly sanding your walls. This helps the new paint stick better to the old surface. If you’re switching between light and dark colors, don’t skip the primer. It makes your paint job last longer and gives you richer, more vibrant colors.
For spaces like kitchens where grease might build up on walls, make sure to degrease first, then sand, prime, and paint.
Painting My Room: Mask Off Everything!
Before you start spraying, mask off anything you don’t want painted—literally everything. Paint mist from the sprayer can settle on any exposed surfaces.
If possible, take furniture out of the room. Remove light fixtures too, if you can. For anything that stays, cover it well with plastic drop cloths to keep it safe from overspray.
Make sure you use painter’s tape to seal any fixtures or furniture that remain in the room. If it is not sealed with tape, there is a chance that the paint mist can find a way through.
Drop Cloth
You will also need to lay a drop cloth over the entire floor. Seal the drop cloth along the edges. If you can afford it, use a canvas paint tarp to protect your floor. It’s heavier than plastic and stops the paint from running upon contact.
A 9’x12’ all-purpose canvas cotton drop cloth is your most affordable option and available on Amazon.
As a final step, you’ll need to make sure your windows are covered with a plastic drop cloth as well. Don’t use canvas here because you’ll likely need the light from the window to work.
Make sure the tape you use is wide enough to cover the woodworking, trim, and sill around the window.
If there are walls, baseboard trim, or other components that will not be painted in the room, then these must be covered as well. Give yourself a couple of hours to ensure that your masking work is done the right way.
It only takes one drop of paint to start a mess and a paint spray gun creates millions of drops of paint when you pull the trigger.
Now You’re Ready to Begin the Painting Process
How to paint a room begins with the prep. Once you’re dressed and the room is properly masked off, you’re ready to break out the paint.
The first thing you’ll need to do is strain the paint. You’ll want to take the paint and run it through a paint strainer to remove any small globs or spots that could clog the paint spray gun.
Just run the paint out of its container through the strainer and into a clean bucket. Once the paint is strained, it’s time to get into your preferred clothing. If you’re wearing the disposable coveralls, get them on now. Put on your goggles and respirator or mask.
Now fill the reservoir of your spray gun with the paint that you’ve strained into the bucket. Make sure the tip you’re using is compatible with the paint you’re using.
Different types of paint require different spray gun tips, so refer to your owner’s manual and manufacturer recommendations for best results.
Once you’ve got the paint loaded into the gun, test your spray pattern on a test board. Use a scrap piece of plywood or cardboard that is lying around somewhere.
In a pinch, you can even use the paint can.
Adjust the spray until you receive an even pattern that provides consistent coverage. You can turn the spray into horizontal or vertical patterns based on how you adjust the tip.
8 Painting Tips When Using a Paint Spray Gun: How to Paint a Room Fast
1. Keep the right distance
Different paints need different spray distances, but a good starting point is about 12 inches from the surface.
2. Use full-arm strokes, not just your wrist
Instead of flicking your wrist side to side, move your entire arm. This helps you get an even finish and prevents wrist fatigue.
3. Work in manageable sections
Focus on a 3-by-4-foot area at a time. Start with horizontal passes, then switch to vertical ones. Moving too slowly can cause paint to dry mid-stroke, leaving unwanted marks.
4. Start your arm moving before pulling the trigger
If you spray before your stroke begins, you’ll end up with thick paint blobs at the start.
5. Stop spraying just before you finish the stroke
This avoids “understroking,” where paint piles up at the end of a stroke and makes your finish look uneven.
6. Once confident, try overspraying
Begin spraying just before your stroke reaches the surface and keep spraying just after the stroke ends. This creates a wider, smoother coverage.
7. Understroking is easier for beginners but slower
If you’re new, understroking helps keep consistency, but with practice, overspraying is faster and smoother.
8. Apply multiple thin coats, not one thick one
Thin layers dry better and look smoother. Take your time since everything is masked off; doing it right the first time saves you from future fixes.
Cleaning Up After You’re Done Working
Once you’ve finished spraying your project and you’re satisfied with the results, then it is time to clean your sprayer.
Your paint spray gun must be the first item you clean after your project.
The paint can dry very quickly within the mechanisms of the sprayer. Once it dries, removing the paint is a time-consuming process.
If you have an air regulator with your sprayer, remove it first. Make sure any compressed air is disconnected before removal, so you don’t splatter paint everywhere.
Then open the lid for your paint cup. Pour out any unused paint that may be in there through your paint strainer. Some of the paint can harden while in the cup, creating globs that you don’t want to have in a clean bucket of paint.
Now take some paper towels and wipe up the leftover paint that remains coated to the surface of the cup. There may be paint on the lid as well that you can clean up with the paper towel.
By wiping out the excessive paint first, you’ll use less paint thinner, and the job will go a bit faster.
Now place the paint thinner that is recommended for your spray gun into the cup. Some sprayers may have a connection for a garden hose, with the recommendation that only water be used for cleaning.
Tips from a Pro
Do not use a paint thinner on your paper towels as the chemicals can degrade the paper materials and leave you with more of a mess.
Learn how to use paint thinner in our latest post so you get it right the first time!
Shake your paint sprayer quickly and as hard as you can without having it impact against a solid object. This will ensure the thinner or cleaner is able to get through the gun, so it can be removed or dissolved.
Then run the waste produced by the cleaner or thinner through the fluid nozzle. Squeeze the trigger as if you were going to apply some paint.
It can be helpful to have the sprayer pointed downward for this process, so the fluid can move its way toward the nozzle if there are tough clogs within the gun itself.
You may be asked to take apart certain components of the spray gun. Do that now. You may need to wash these components individually or soak them in paint thinner.
If your gun has a hose attachment, disconnect the water source before taking the sprayer apart to prevent having a huge mess on your hands.
Steps to Disassemble Your Sprayer
As you disassemble the sprayer, follow these steps if there are no steps recommended in your owner’s manual.
- Remove the fluid needle. This will prevent you from accidentally damaging it or being it as you remove the other components.
- Remove the air cap. You will be turning it counter-clockwise. Then use your key to remove the fluid nozzle underneath the air cap.
- Depress the trigger. This will help you to remove any remaining fluid from the interior of the sprayer.
As you remove components, you may discover that there is paint on them. Clean each component before moving onto the next step.
Once fully washed, you will want to wipe down every component until it is dry.
You do not want the paint sprayer to air dry unless the manufacturer specifically recommends it.
Now keep repeating the cleaning steps until you are satisfied that you have removed all the paint from the sprayer.
Then reassemble your paint sprayer.
This process may take up to 60 minutes.
Conclusion
Paint sprayers require a lot of preparation time and a lot of cleanup time. That means they work best for large projects with big spaces to paint. If you have a small project to do, a traditional paint roller or even a paintbrush might be a better option.
If you do decide to use a paint sprayer, then be sure to keep this guide handy as you get to work. That way you’ll be able to prepare with ease, paint with confidence, and cleanup like a pro.
And be sure to have some fun while you’re working.
- Paint Sprayers for Painting Rooms
- Top Spray Gun for Painting Walls
- Top 5 Paint Sprayers Editor's Choice Reviews
- Fuji Semi Pro 2
- Graco Magnum Project Painter Plus
- Krause and Becker
- Earlex HV5500
- Neu Master
- Join our Email List for more Tips and Info!
- What do I Need to Paint a Room?
- How to Prep a Room for Painting
- Now You’re Ready to Begin the Painting Process
- 8 Painting Tips When Using a Paint Spray Gun: How to Paint a Room Fast
- Tips from a Pro
- Conclusion
- FAQs
FAQs
When paint a room with a paint sprayer, it will take much less time than brushing or rolling. After masking off your area, a standard sized room should take about 10-20 mins to paint 1 coat (this doesn’t include drying time).
Repair imperfections on the walls and sand down any lumps or bumps. Redo any caulk that is old and apply new caulk to any cracks. Once dry, sand the walls.
Lay down plastic sheeting, a drop cloth or newspaper in the areas you want to protect from paint, lightly sand your walls, then apply two coats of primer. Once dry, apply your paint.
Prep work such as sanding and filling imperfections in your walls. Prime and paint the ceiling first. Then prime and paint your walls. Trim and doors are last.


